Home to Roost Gift Box with Chic n Scratch, Stampin’ Up! Demonstrator Angie Juda

My crafty project for you today is the Home to Roost Gift Box.
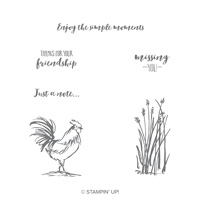
When I woke up with morning it hit me that I could color this darling rooster any color I wanted. For some reason I kept trying to color him like a real live chicken…. and it wasn’t working for me.
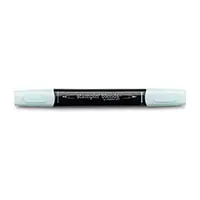
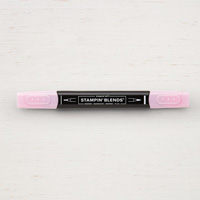
I used three Stampin’ Blends Markers:
- Light and Dark Granny Apple Green Stampin’ Blends Markers
- Light Pool Party Stampin’ Blends Marker
- Light Flirty Flamingo Stampin’ Blends Marker
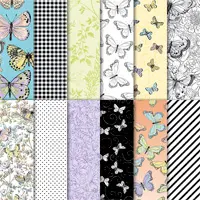
Since I have an abundance of the Botanical Butterfly Designer Series Paper … I went with Lemon Lime Twist card stock. This paper is the B side of one of the butterfly patterns of paper.

I used three Sale a Bration items on my project today….
Here’s how to make this Home to Roost Gift Box…

I love comments!! If you have any questions/comments about this post please leave a comment.
Thanks & have a great day! ?
My other offerings…

Stock up on your Stampin’ Up! Adhesive and save money!!
This year our price reflects FREE TAX and FREE SHIPPING.
These Adhesive Bundles would be a perfect gift for any papercrafter and Mother’s Day is just around the corner!!

Any size order receives the Stampin’ Anonymous Tutorial FREE!
You have three ways to get these amazing tutorials….
- Receive it FREE with any Stampin’ Up! order placed with me this month.
- Purchase the PDF tutorials for $9.95 (one month cost). Click here to Buy Now.
- Join my Team! They get them free!
- Sale a Bration – More product available – Click here for all the details!
- Chic Rewards
- Join Stampin’ Up! for $99 – Starter Kit value $175
- Chic Stands & Coasters
- March 2019 – Host Code: FX7T2ZGW
If you would like to purchase any of the product used in making the Home to Roost Gift Box, here’s the Stampin’ Up! Shopping List:


Angie this is adorable! I appreciate the directions for this box. I Make papaer roses with the old ornament punch and sell them. I was buying the craft boxes and they fit perfectly but they’re discontinued. This box would work out great!!
Thanks again!
Great box Angie The top part of the rooster’s head is called the comb, the little piece under is the waddle.
Loved the colors that you used.
Love this box!!!
I too Angie just can’t work with liquid glue…I get more on me than my project & the table & every place else… I hate it. I envy those who can do it without a mess but that’s just not me! Lol!!! ?
You always seem to have sooo much fun when you are making videos for us to learn!! Thank You!
Love that box, the colors too and the rooster stamp..when I was little (a long time ago)living in the country and we had chickens..called Rhode island reds…
I love this light colored rooster! I like how you think outside of the box!
Cute I love the colors
Nice box and I really like that rooster.
Have a nice evening and what’s for Facebook live tonight?
Too darn cute! Just when I didn’t think I needed the rooster! I will watch this later.
Awesome little box..Love that rooster, & I thought the same thing that I had to color him rooster colors. I’m so glad you showed this project, now I can color him whatever cooridinates. Thanks for sharing Angie,
Peggy
So cute. I always struggle with wanting to color everything the proper colors, but who says we have to 🙂
Once again a very cute box. Love your 3D projects. Thanks Angie.
Darling little box!
I love the colors that you used for the rooster. It makes this stamp so much more fun to use.
I absolutely adore this darling box!!!
So cute
Cute box.
Very cute. Love the rooster. The comb is on top of his head and the wattle is under his beak.
Nice take on the colors, like how you think outside the box.
VERY CUTE
Brillant just love that gorgeous box just love what you do