Little Halloween Box

Twick or Tweet bite

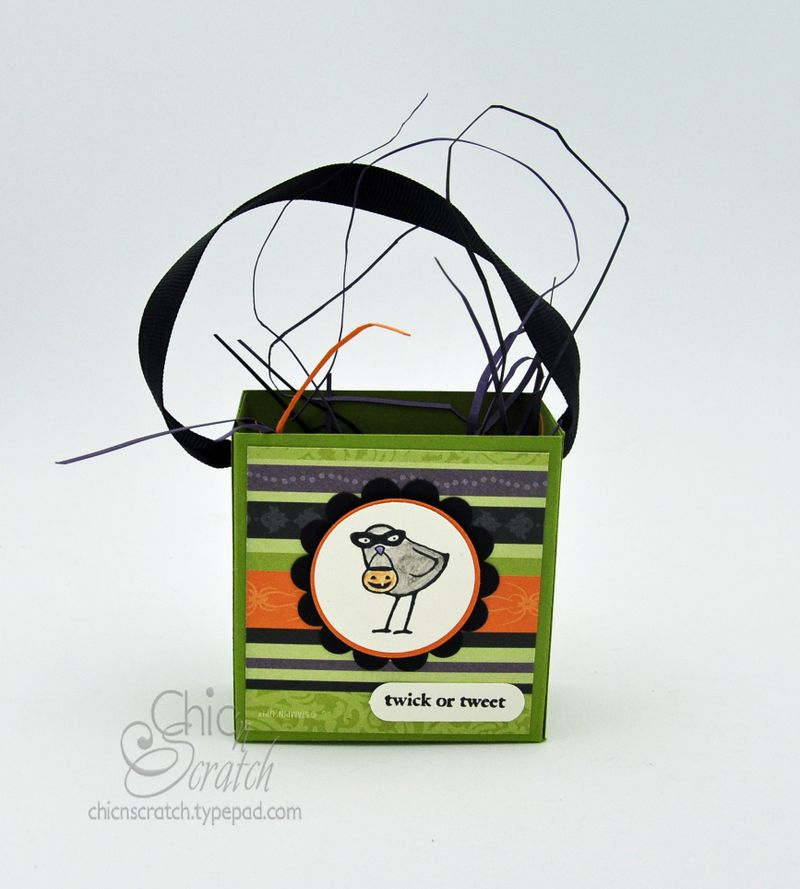
Hi,  this is the same box as yesterday and you can click here if you’d like to watch the video on how to make it.  The video includes how to assemble the box decorated with the Frankenstein face…but to make it this way all you do is add some Cast a Spell Designer paper and some ribbon for a handle. 

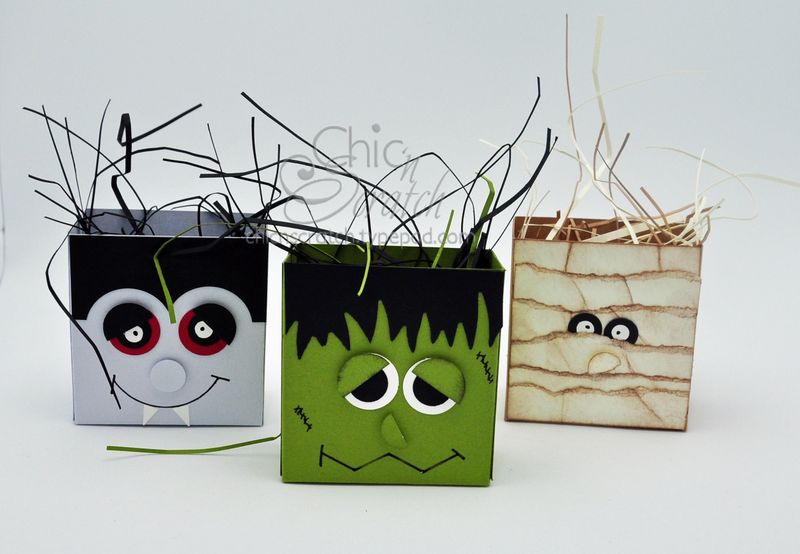
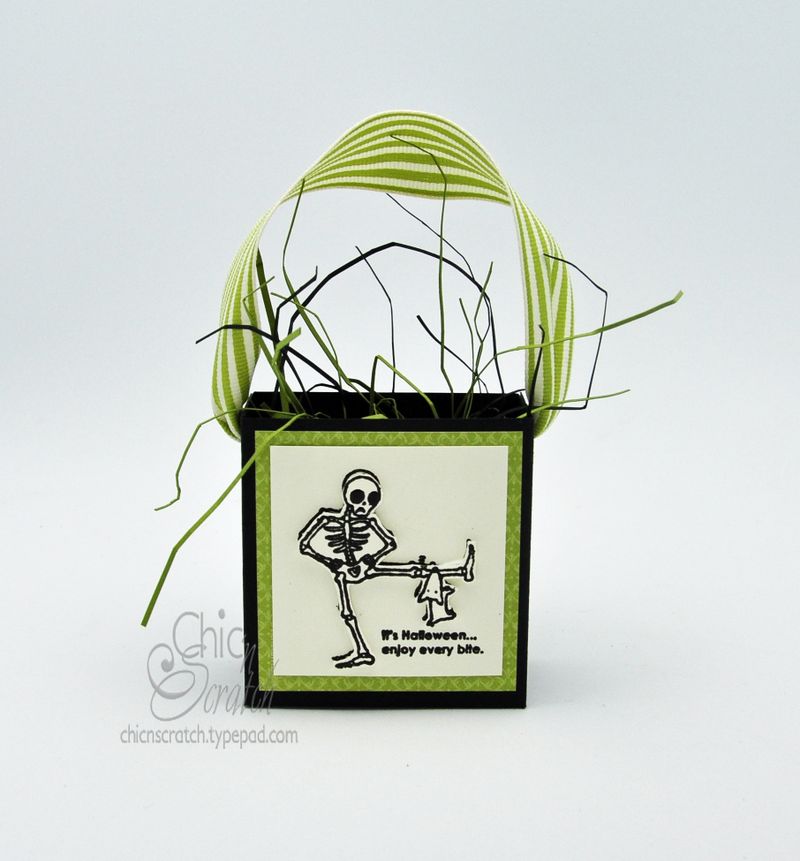
Tomorrow I’ll show you the picture of all three of the boxes that I made with the Twick or Tweet Stamp set & Cast a Spell Designer paper.  Don’t you love that dog hanging on to the skeleton?

Thanks for stopping by!

Click here if you’d like to place a Stampin’ Up! order.

Sept 9th update:  Congrats to Kaylene Ott….your name was drawn to win the 3 months of my 3D Kit club.  Thanks to everyone that send me an email!!

p.s.   I need your help making a decision.   I try my very hardest to always put myself in your shoes and make decisions that I would appreciate if I were the customer.  With that being said….the other side of me also wants to be “the early bird that catches the worm” (now you can see why some call me a worry wort).   Stampin’ Up! has just released the My Digital Studio.  It’s available this month for demonstrators & on October 1st you can purchase it.   My dilemma is my heart tells me to hold off showing you all the stuff because you can’t order it yet….but my head is saying show it all as soon as possible.   Please tell me….as my customers….what should I do?  Show it now?  Or save it for when you can order it?   Instead of posting a comment on this blog…I’m closing the comments and asking that you email me what you think.     On Tuesday I’ll make my decision and give one lucky person a 3 month membership to my 3D Kit club (name will be drawn from everyone that sends me an email with their opinion).


Little Halloween Box

Frankie Box | Frankenstein Box | Franky Box

Today’s video is on how to make the Frankenstein box or a Kit Kat Holder.  The only size difference is the hair measurements (the hair on the Kit Kat holder is 2 1/2, versus 2 3/4 on the box).

Little Halloween boxes

I made the Dracula, Mummy, Frankenstein and three other boxes.  The box measurements are the same, I just decorated it differently.

Supply list to make the Frankenstein Box:

  • Old Olive Cardstock 2 pieces 5 1/2 x 4 1/4 and score at 1 3/8 on two sides & bottom
  • Black Marker
  • Hair is a Grass die found at our local scrapbook store (measures 2 3/4 x 1 3/8)
  • White Eyes – 3/4 Circle
  • Black Eyes – 1/2 Circle
  • Old Olive Eyelids – 3/4 Circle  (cut in half)
  • Old Olive Nose – 1/2 Circle (cut in half)
  • Stampin’ Dimensionals
  • Black ink
  • Sponge
  • Adhesive
  • Template for mouth

Notes for Kit Kat Holder

  • Hair will measure 2 1/2 x 1 3/8
  • 10 1/2″ Black Grosgrain ribbon needed for handle
  • Modern Label Punch to punch for the candy bar

Here’s two more pictures of the other boxes…..Little halloween box

Supply List:

  • Twick or Tweet Stamp set #116497
  • Scallop Circle Punch – Black cardstock #109043
  • Word Window Punch – White Cardstock #105090
  • Old Olive Cardstock – Box
  • Cast a Spell Designer Paper #115677
  • Black Grosgrain Ribbon#115605
  • Watercolor Pencils #
  • Blender Pen #102845
  • Crop a dile (used to make the holes for the ribbon) #108362
  • 1 3/8 Circle Punch – White Cardstock #104401
  • 1 1/2 Circle from Circles #2 die #114526 – Pumpkin Pie Cardstock

Twick or Tweet bite

Click here if you’d like to place a Stampin’ Up! order.


Twick or Tweet Box

Twick or Tweet Box

My project today is one that I’ve been waiting a week to show you.  I used the brand new Twick or Tweet stamp set from the Holiday Mini Catalog.  And, I used the Cast a Spell Designer paper to decorate the box. (Club ladies, this is one of your September club projects.) 

Supply List:

  • Twick or Tweet Stamp set #116497
  • Scallop Circle Punch – Black cardstock #109043
  • Word Window Punch – White Cardstock #105090
  • Old Olive Cardstock – Box
  • Cast a Spell Designer Paper #115677
  • Black Grosgrain Ribbon#115605
  • Watercolor Pencils #
  • Blender Pen #102845
  • Crop a dile (used to make the holes for the ribbon) #108362
  • 1 3/8 Circle Punch – White Cardstock #104401
  • 1 1/2 Circle from Circles #2 die #114526 – Pumpkin Pie Cardstock

I’ve decided to call it the Little Halloween box because I came up with the idea all on my own.  I filmed a video to show you how I made it and how I came up with this size.  But…instead of showing you how to make it with this design….I decorated it with the Frankenstein.  I’ve made about ten of these boxes and over the next couple days I’ll show you the others. 

 Here’s the picture of the Frankenstein, Mummy & Dracula.  You can get two of these boxes per sheet of cardstock….isn’t that awesome?  

Little Halloween boxes

Last year when I made 30 of the Franky boxes with the Rebar Tie Wire it took me hours to make them….so this year I decided to go with fast & affordable.  I’m determined that this year I’m getting my goodies made early.

Have a great day!!

Click here if you’d like to place a Stampin’ Up! order.

p.s. The box is loading on You Tube now and as soon as it’s done I’ll post a link right here when it’s available.

What’s next?  Tomorrow I’ll post the Free stamp set winner for August and the Free set for September. I’ll also post the details for the Creative Contest. (If my headache goes away I may get it posted this evening but for now I need to focus on getting rid of this terrible sinus headache…..it’s that time of year again!)


Mummy Candy Bar/Kit Kat Holder

Good morning!

I just posted the video on how to make the Mummy Kit Kat Holder and you can click here if you’d like to head over to my Chic n Scratch Live! website to watch it.

Here’s a few reminders…..

  • Today is the last day of the August and that means it’s the last day to purchase the Mini Starter Kit for $85.  If you would like more info please let me know. I should be around most of the day if you’d like to call me.  913-851-3336
  • Tomorrow is the first day of September and that means the Holiday Mini Catalog begins.   Some of you have not received your mini catalog and I feel your pain.  But…. you should be getting it very soon.  Stampin’ Up! posted last week that some of them were delayed in shipping but that you should get it this week.  If you’re a customer of mine I paid Stampin’ Up! to mail the catalog to you and please hang on just a few more days.  Don’t forget you can view it online first thing in the morning.
  • Remember the Creative Contest I hosted while I was at Convention?  I’m ready to start the next one. It will work just like last time and the projects need to be sent to me by Sept 12th. The winner will receive any free stamp set from the catalog….. I’ll post all the details tomorrow. 

Have a great day!!

Click here if you’d like to place a Stampin’ Up! order.

Personal stuff….I spent most of the weekend with the family.  Saturday we went to the Kansas City Chiefs football game and we did the tailgate thing.  I’m so happy the weather was nice…the last time I went to a Chiefs game I stayed in the restrooms ….where the heat was :O 

Dracula, Mummy & Frankenstein Candy Bar Holders

Dracula Mummy & Frankenstein Candy Bar Holders

The video on how to make the Dracula Candy Bar Holder is ready & posted on my Chic n Scratch Live! website.  Click here to go there now. Here’s the photo as a reminder…..Halloween Kit Kat Holders

After making the Kit Kat/Candy bar holders I couldn’t resist making them into a box (you’ll see it on the Dracula video).   It’s a box that I created myself and I’ll post the video for you on Monday, it’s already filmed I just need to edit and load it on You Tube. 

The picture I’m sharing today is coming from left field but it’s something I’ve wanted for a long time and decided to share it with you.  My stamps are finally organized…perfectly 🙂  It’s taken me forever and I cant’ take credit for it (I had a few helpers along the way).   I’ll share the photo and then explain.

Stamp Shelves  

The first thing I like to do when I get a new stamp set is label it with my PTouch.  (A PTouch is the most awesome labeling machine in the whole world, I bought my first one in 1992….are you wondering how I know what year?  That’s the year Chase was born….back when I used to be very organized.)

Next I l add a small dot that reflects what category it goes in.  I follow the same categories that’s in the Stampin’ Up! catalog….makes perfect sense to me 🙂 The pumpkin dots are Greetings, Red are Holidays, Black are Elements, Chocolate are All Natural, Old Olive are Occasions, Bashful Blue are Growing Up, Lavendar Lace are Hostess, YoYo Yellow are Mini Catalogs.   What I did was run my cardstock through a Xyron and then punched the circles with my 1/2 circle punch.

Have a great day!!

Click here if you’d like to place a Stampin’ Up! order.

Dracula Candy Bar Holder

Today’s video is on how to make the Dracula Candy Bar Holder (the Mummy video has been filmed and will be loaded asap).

Halloween Mummy & dracula_edited-1

Here’s a list of supplies to make the Dracula:

  • 1 1/4 Circle Punch — Hair
  • 3/4 Circle Punch – Red Eyes
  • 3/4 Circle Punch – Black Eyebrows
  • 1/2 Circle Punch – Black Eyes
  • 1/2 Circle Punch – Almost Amethyst Nose
  • 1/4 Circle Punch – White Eyes (handheld punch)
  • Large Star Punch – White Teeth/Fangs
  • 10 1/2″ Black Grosgrain Ribbon
  • Almost Amethyst Cardstock 10 x 2 1/2


Click here if you’d like to place an Stampin’ Up! order or join my team.


Build a Bear Bag

Build a Bear Bag

Good afternoon,

What do you think of this darling bag?   When I saw the Build a Bear items in our Holiday Mini Catalog I just about screamed with excitement!!   The Holiday Mini Catalog starts Sept 1st and if you order your Stampin' Up! supplies through me, your catalog is on it's way to you (They're shipping a tad late, but you should get it around Sept 1st…also you can view it online Sept 1st.)

Attending Convention convinced me to give Workshops a try again.   So, I decided to sweeten the deal for September.   Anyone that hosts a workshop for me in September, will get the kit & instructions to make this darling bag.  If you're one of my dear long distance customers, I simply can not leave you out.  If your order in September reaches $250 you'll be included (ask a few friends if they'd like to participate in a catalog party).  

Here's the details:  Host a local workshop for me in September and at your workshop I'll bring your kit.   Or long distance ladies, place a hostess level workshop order with me ($250 or more) and your kit will ship the first week of October.

Now for the details on the bag….I used the Build a Bear Big Shot die with the Kooky Spooky Halloween die.  The stamp set is Eat, Drink & Be Scary.  I used the Small Oval Punch for the Handles.  Here's a picture of the side view…..

Builda a Bear Bag side

I've been super productive the past few days and I just finished three videos.  I'll try to get at least one of them posted mid morning tomorrow.

Have a great day!

Click here if you'd like to place a Stampin' Up! order or join  my team.

Halloween Kit Kat Holders

Halloween Kit Kat Holders | Frankie Kit Kat Holder | Mummy Kit Kat Holder | Dracula Kit Kat Holder

I hope you think these goodies are worth the wait.  I started working on the Halloween Kit Kat Holders yesterday and didn’t want to show them to you until I finished all three.

Halloween Kit Kat Holders

You’ve seen me make the Frankenstein & Mummies over the past three years but the Dracula is a new one for me.   I owe my friend Julie a huge thanks (thanks Julie!! I owe you one) I had trouble figuring out how to do his hair and she emailed me a picture this morning on how to use a circle punch to make his hair.

I’ll get busy filming the videos tomorrow. Do you want to see a video on how to make each one of these or just the Dracula?   To make the Kit Kat Holder I have video available on my Chic n Scratch Live! website and you can click here to view it.  Or to make a mummy I have a picture tutorial available and you can click here to view it.

Halloween Mummy & dracula_edited-1

Thanks for the emails and kind words about my first audio message.  I was nervous and excited all at the same time. 

Thanks for stopping by!!

Click here if you’d like to place a Stampin’ Up! order or join my team.

Halloween Box

Halloween Box

Good afternoon!!

My project today is the Halloween Gable Box.  It's also one of the projects for my Halloween Class.   I will also offer the kit for my long distance ladies. (I need to create a few more projects before I finalize it.)

I used the Cast a Spell Designer Paperto cover the front of the box.  This year I left the back side blank….but here's what I'm thinking…you could personalize it with a name…maybe using the Simple Letters die with the Big Shot.  Or you could spell out "boo".

The black cat and the images on the side are from the Halloween Frights stamp set and the witches hat is from the Eat, Drink & Be Scary and the Trick or Treat is in the Tasty Sweet stamp set.

Thanks for stopping by!!

Click here if you'd like to place a Stampin' Up! order.

p.s. Chase & Brooke had lots of fun at Worlds of Fun.  I rode two rides.  The Prowler was just too much for me.  I screamed the whole time…..then I got a headache :)  I loved the Cyclone Sam ride (it reminded me of rides at Universal Studios …..I like indoor rides).

Spooky Treats

Good morning!

The first picture today is a group shot of the Halloween Treats I've been working on.   They are super easy to make and affordable as well.   I used the Halloween Hoot stamp set, the Holiday Best Hostess stamp set & the Eat, Drink & Be Scary stamp set.  You don't need to use all these sets….. I wanted to show you how to use what sets you have. 

Halloween treats group  

Last year I used the Batty for you stamp set on several of my Halloween treats and I'm pretty sure I need to dust that set off and use it too!!

The next two photos are close ups of the two I didn't show yesterday. 

 Halloween hoot treat

Spider Treat

My final picture is a side view of one of them so you can see what it really looks like.  Again you can use any of the treat size Halloween candy.

Halloween treats cast a spell  

Have a great day and thanks for stopping by!!

Click here if you'd like to place a Stampin' Up! order.

p.s. Ladies if you're attending Card Class tonight, don't forget to bring your adhesive.

p.s.s.  Over the weekend I'll be sharing some Convention swap cards, we have another busy family weekend.   I'll resume posting the Halloween items on Monday (if all goes well, the video should be available also).    See ya 🙂


Item added to cart.
0 items - $0.00