Happy Halloween

Happy Halloween | Frankie Box

Frankenstein-2010n2
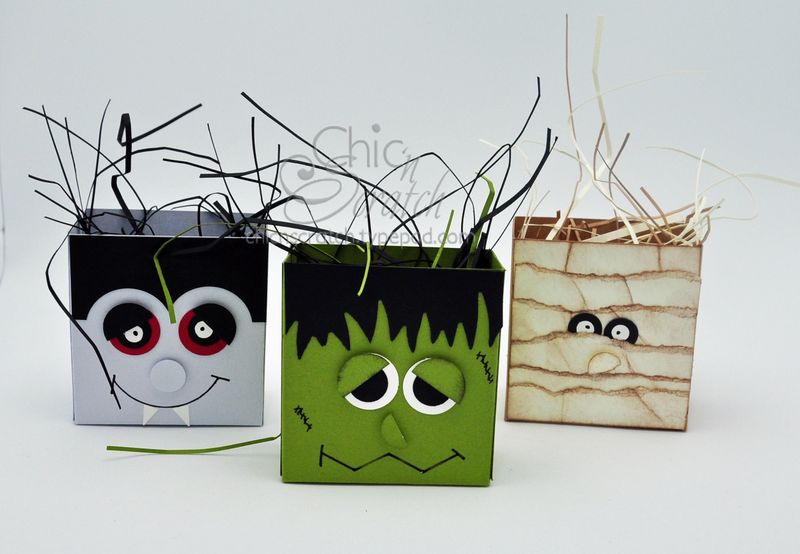
Yesterday we made the Frankenstein box on UStream….doesn’t he put a smile on your face?  I’ve been hooked on making Frankenstein faces since my friend Julie shared it with me many years ago. Every year we just change him up a bit 🙂

If you watched my live show on UStream….I made some changes….I figured out that his eyes needed to be bigger. So…if you like the one on the right…bigger eyes is the only difference….wait ….I also used Pear Pizzazz instead of Old Olive.

Click below if you’d like to watch a video on how to make the Frankenstein Box. Also known as Frankie Box or Franky Box.

Frankenstein-2010
Here’s a flashback picture 🙂  Can you believe I made these for my Yard Sale that year?

Angies_yard_sale Angie Supplies Graphic-1

  • 1″ Circle Punch #119868
  • 3/4″ Circle Punch #119873
  • Pear Pizzazz card stock #119795
  • White card stock #100730
  • White Gel Pen #105021
  • Spider Web Embossing Folder #120889
  • Sponges #101610
  • Basic Black card stock #121045
  • Dimensionals #104430
  • Scallop Border Punch #119882
  • Template for mouth (see video)

Order Stampin' Up!

p.s. Congrats Lil!! You won the make n take kit…..please send me an email with your address and I’ll mail your kit out right away.   Here’s her comment:

Thanks for the stream can’t wait til tomorrow..

Posted by: Lil | October 30, 2010 at 01:20 PM


Hershey Bar Candy Holder

Hershey Bar Candy Holder

XL Candy Bar Holder with Stampin’ Up! Demonstrator Angie Juda

Spirits candy bar wrapper


Angie Supplies Graphic-1

  • Nite Owl DSP #123012
  • Black Taffeta Ribbon #119962
  • Crop a dile #108362
  • Black card stock #121045

Candy Bar Holder

Candy Bar Holder – XL Candy Bar Holder

Hershey Candy Bar Holder with Stampin’ Up! Demonstrator Angie Juda

Spirits candy bar
My project today is a Hershey Candy Bar Holder.  This idea has been around longer than I have.  In fact when I showed it to one of my girlfriends last week she reminded me of the popcorn bag holder we made using the Halloween Hedgehogs ….around 6 years ago (I need to find that sample…I know I still have it).

To get the candy bar out all you do is lift the ribbon…..I’m working on a video & hopefully it will be ready this evening.

For this one I wanted it to be quick & easy….many of us are in a hurry and and when I looked at the Nite Owl Designer Paper I knew I could make some projects really fast!  If you wanted to add some color you could use markers and color the image.

Angie Supplies Graphic-1

  • Nite Owl DSP #123012
  • Black Taffeta Ribbon #119962
  • Crop a dile #108362
  • Black card stock #121045

Have a great day!!

Order Stampin' Up!


Lunch Sack Halloween Treat Holder


  Lunch sack treat holder open

Little Halloween Box

Frankie Box | Frankenstein Box | Franky Box

Today’s video is on how to make the Frankenstein box or a Kit Kat Holder.  The only size difference is the hair measurements (the hair on the Kit Kat holder is 2 1/2, versus 2 3/4 on the box).

Little Halloween boxes

I made the Dracula, Mummy, Frankenstein and three other boxes.  The box measurements are the same, I just decorated it differently.

Supply list to make the Frankenstein Box:

  • Old Olive Cardstock 2 pieces 5 1/2 x 4 1/4 and score at 1 3/8 on two sides & bottom
  • Black Marker
  • Hair is a Grass die found at our local scrapbook store (measures 2 3/4 x 1 3/8)
  • White Eyes – 3/4 Circle
  • Black Eyes – 1/2 Circle
  • Old Olive Eyelids – 3/4 Circle  (cut in half)
  • Old Olive Nose – 1/2 Circle (cut in half)
  • Stampin’ Dimensionals
  • Black ink
  • Sponge
  • Adhesive
  • Template for mouth

Notes for Kit Kat Holder

  • Hair will measure 2 1/2 x 1 3/8
  • 10 1/2″ Black Grosgrain ribbon needed for handle
  • Modern Label Punch to punch for the candy bar

Here’s two more pictures of the other boxes…..Little halloween box

Supply List:

  • Twick or Tweet Stamp set #116497
  • Scallop Circle Punch – Black cardstock #109043
  • Word Window Punch – White Cardstock #105090
  • Old Olive Cardstock – Box
  • Cast a Spell Designer Paper #115677
  • Black Grosgrain Ribbon#115605
  • Watercolor Pencils #
  • Blender Pen #102845
  • Crop a dile (used to make the holes for the ribbon) #108362
  • 1 3/8 Circle Punch – White Cardstock #104401
  • 1 1/2 Circle from Circles #2 die #114526 – Pumpkin Pie Cardstock

Twick or Tweet bite

Click here if you’d like to place a Stampin’ Up! order.


Dracula Candy Bar Holder

Today’s video is on how to make the Dracula Candy Bar Holder (the Mummy video has been filmed and will be loaded asap).

Halloween Mummy & dracula_edited-1

Here’s a list of supplies to make the Dracula:

  • 1 1/4 Circle Punch — Hair
  • 3/4 Circle Punch – Red Eyes
  • 3/4 Circle Punch – Black Eyebrows
  • 1/2 Circle Punch – Black Eyes
  • 1/2 Circle Punch – Almost Amethyst Nose
  • 1/4 Circle Punch – White Eyes (handheld punch)
  • Large Star Punch – White Teeth/Fangs
  • 10 1/2″ Black Grosgrain Ribbon
  • Almost Amethyst Cardstock 10 x 2 1/2


Click here if you’d like to place an Stampin’ Up! order or join my team.


Halloween Kit Kat Holders

Halloween Kit Kat Holders | Frankie Kit Kat Holder | Mummy Kit Kat Holder | Dracula Kit Kat Holder

I hope you think these goodies are worth the wait.  I started working on the Halloween Kit Kat Holders yesterday and didn’t want to show them to you until I finished all three.

Halloween Kit Kat Holders

You’ve seen me make the Frankenstein & Mummies over the past three years but the Dracula is a new one for me.   I owe my friend Julie a huge thanks (thanks Julie!! I owe you one) I had trouble figuring out how to do his hair and she emailed me a picture this morning on how to use a circle punch to make his hair.

I’ll get busy filming the videos tomorrow. Do you want to see a video on how to make each one of these or just the Dracula?   To make the Kit Kat Holder I have video available on my Chic n Scratch Live! website and you can click here to view it.  Or to make a mummy I have a picture tutorial available and you can click here to view it.

Halloween Mummy & dracula_edited-1

Thanks for the emails and kind words about my first audio message.  I was nervous and excited all at the same time. 

Thanks for stopping by!!

Click here if you’d like to place a Stampin’ Up! order or join my team.

Item added to cart.
0 items - $0.00